October 14, 2026Pixyn Team
Pixyn Director: a 3D Scene as a Reference for AI Video
Pixyn now has a free Director section: build a 3D scene from grey mannequins, place the camera and set its motion, render a previz clip and give it to an AI video model as a reference. We walk through the whole flow with screenshots.
TL;DR. Director in Pixyn Lab builds a simplified 3D scene: a room, blockout furniture, grey mannequins and a camera that moves by keys. The scene becomes a previz clip in MP4 that you upload to an AI video model as a reference: the clip shows the model the camera, the angle and the character's path, while looks and light come from your prompt and photo. Building the scene and rendering cost no tokens, and AI assistant answers are free right now too. Tokens are spent only on generating the video in the studio.
Why an AI video model needs a 3D previz
A prompt is bad at describing space. The line "the camera slowly pushes in, she walks from the door to the window and stops at the desk" leaves five questions open: where we shoot from, how fast, where the door is, where the window is, at which second she stops. The model answers them on its own, and differently on every run.
A reference clip closes those questions. In film this rough clip is called a previz (previsualization): the scene is played out with simple figures before the shoot to agree on angles and movement. For an AI model a previz works the same way: video models with a reference mode take the clip as input and use it as a guide for camera and motion.
Hence the principle of the section: the scene is made of grey blockouts. The model paints the realistic picture, and from the previz it only needs geometry: who stands where, where they go and how the camera moves.
What the previz sets:
- camera angle and height;
- camera movement: push in, orbit, crane;
- the character's path and pace;
- placement of furniture and props;
- duration and editing of the scenes.
Where to find Director: the section is free
The section lives in the Pixyn Lab menu under Director, at pixyn.ai/director. Director is free: building the scene, mannequins, animations, camera, rendering the MP4 and AI assistant answers cost no tokens. You only need an account: projects are saved to it, and you can come back to them from any computer.
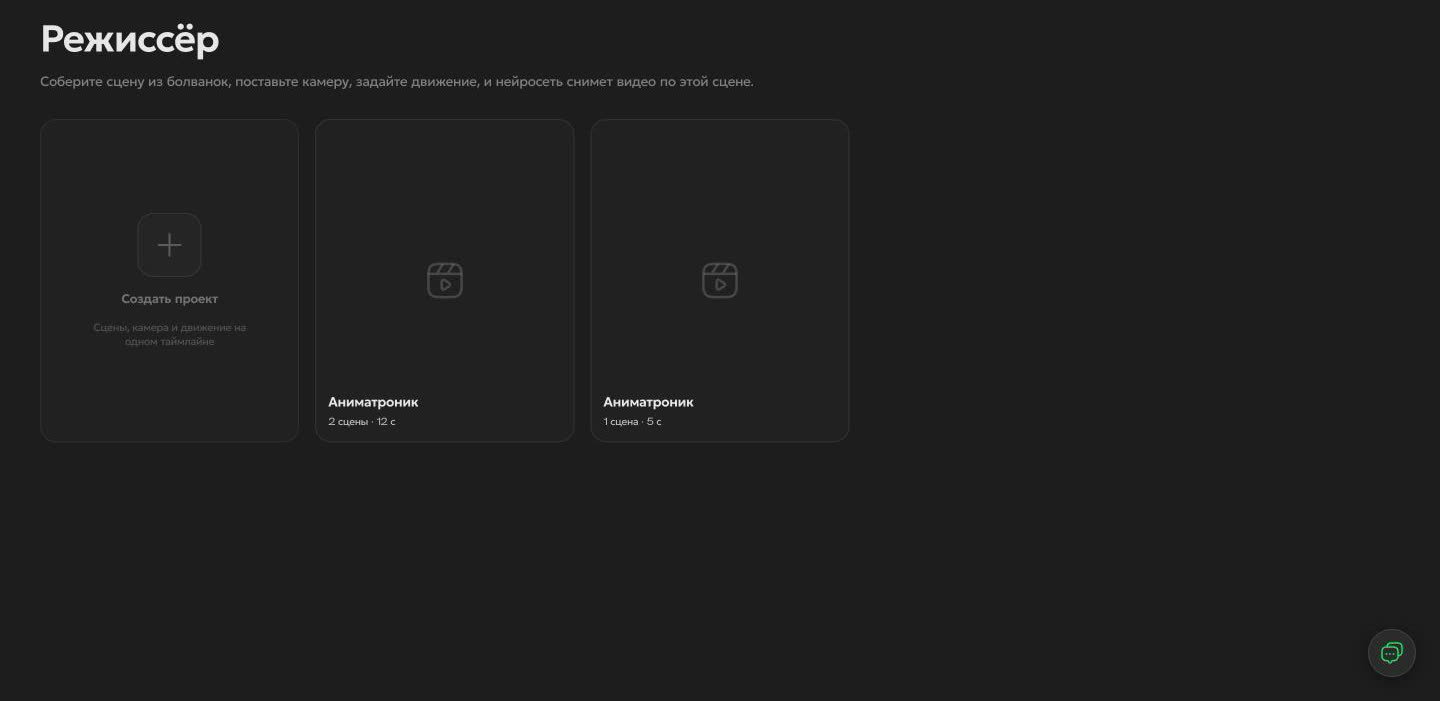
Step 1. The scene: ready-made, empty or described in words
A new project opens with the "How do you want to start?" window. There are three options: an empty room 8 × 6 × 3 m, one of six ready scenes, or a description in words for the AI assistant. A ready scene is copied into your project, and your edits do not touch the library.
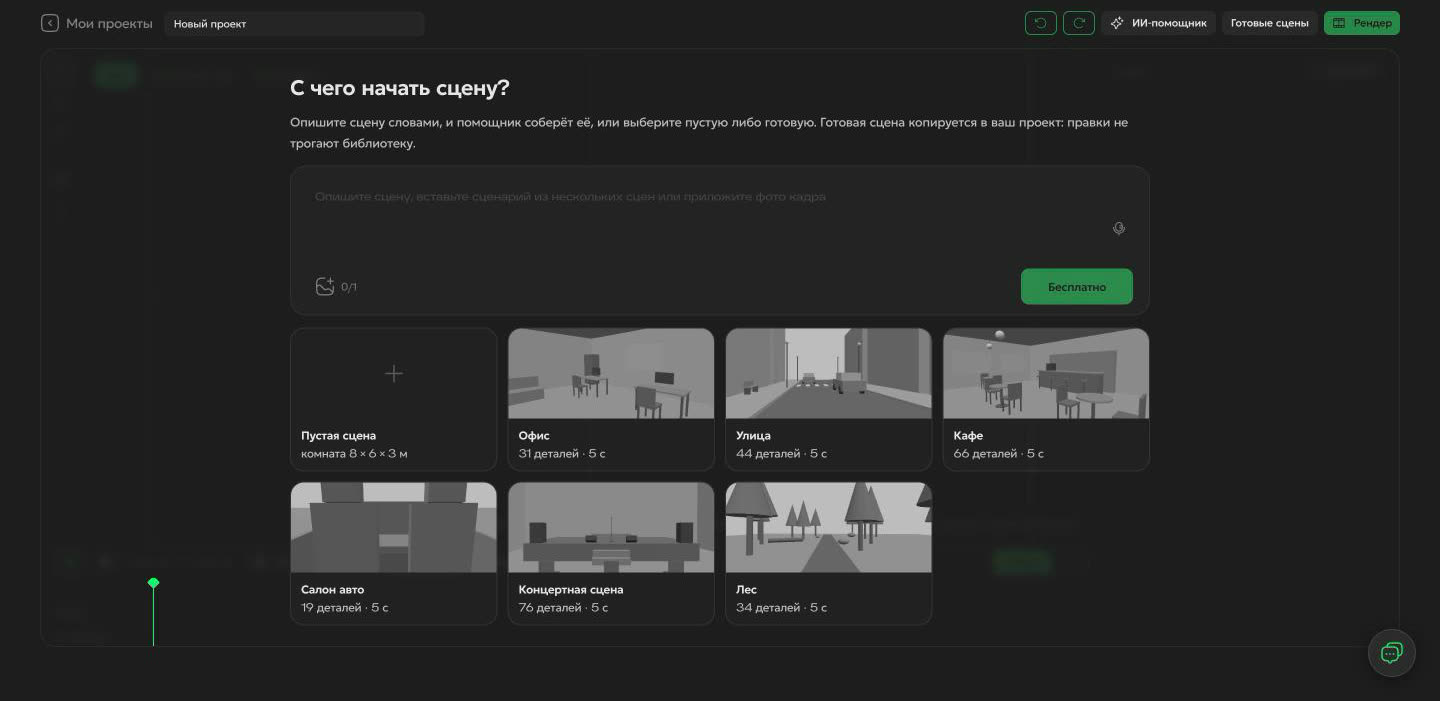
| Ready scene | Parts |
|---|---|
| Office | 31 |
| Street | 44 |
| Cafe | 66 |
| Car interior | 19 |
| Concert stage | 76 |
| Forest | 34 |
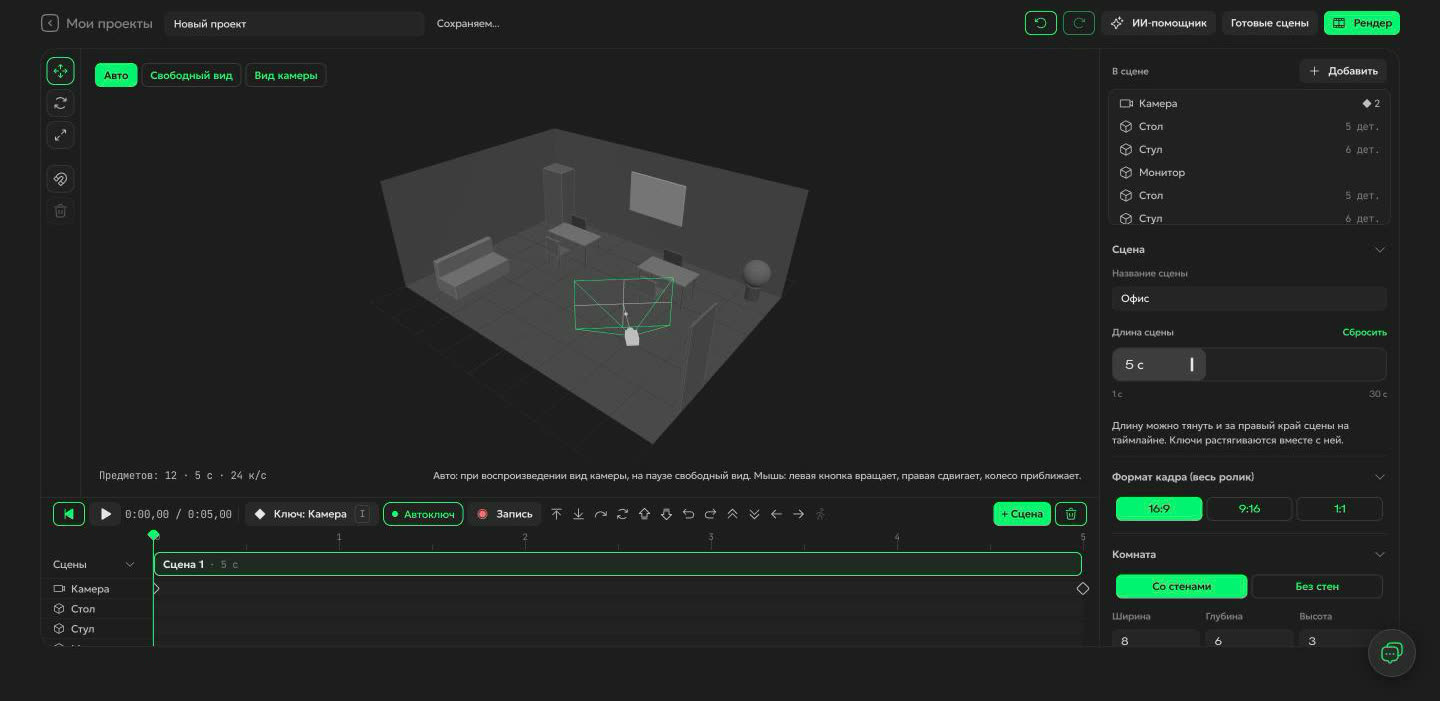
Then comes the editor: tools on the left (move, rotate, scale, snap), the 3D window in the middle, the In scene list and the properties of the selected object on the right, the timeline at the bottom. Above the window there are three view tabs: Auto, Free view and Camera view. In Auto mode you see the whole room while paused and look through the camera during playback.
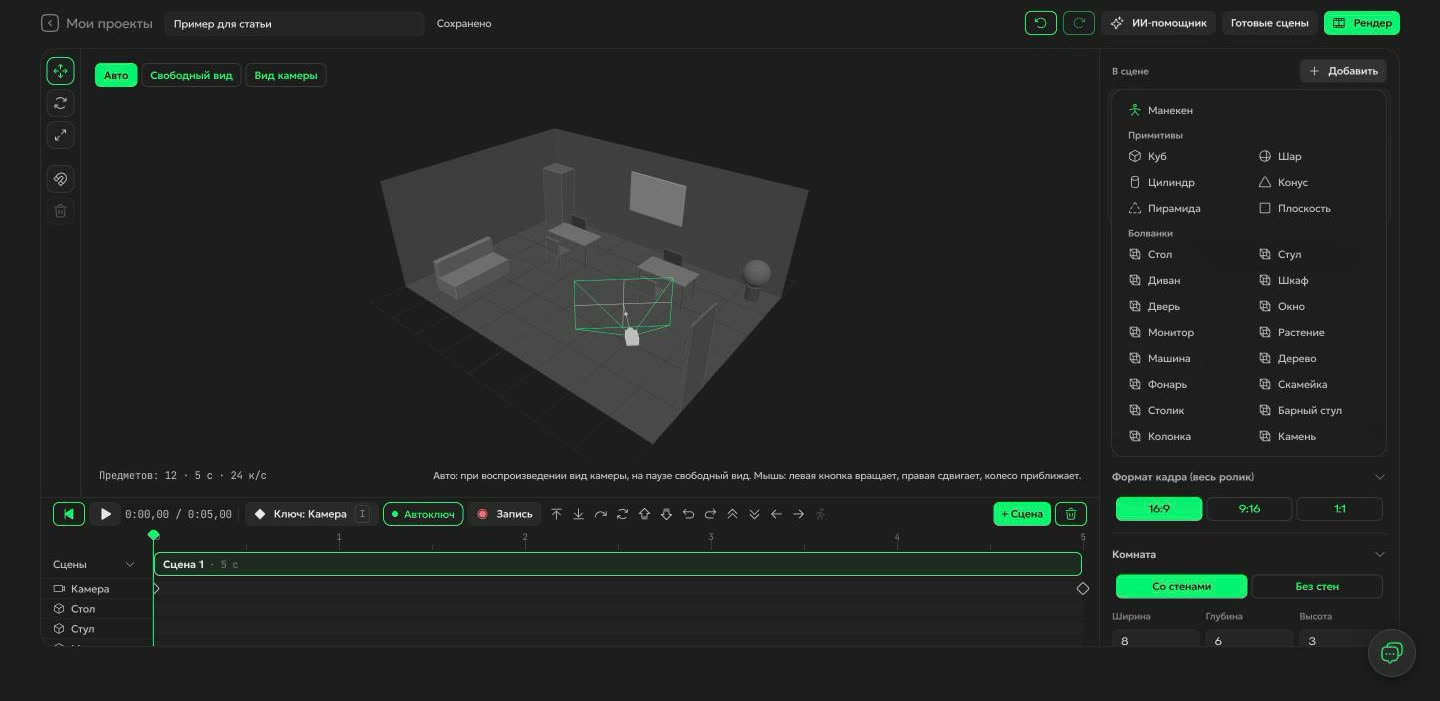
Objects are added with the Add button: six primitives (cube, sphere, cylinder, cone, pyramid, plane) and ready blockouts such as a desk, sofa, door, window, car, tree, street lamp and bar stool. Everything is grey: the colour of objects in the shot comes from the prompt, not the scene.
Step 2. Mannequins, animations and the character's path
People in the scene are mannequins: grey jointed figures, up to 12 per scene. You set height, pose, joint rotations and mirroring in the panel on the right.
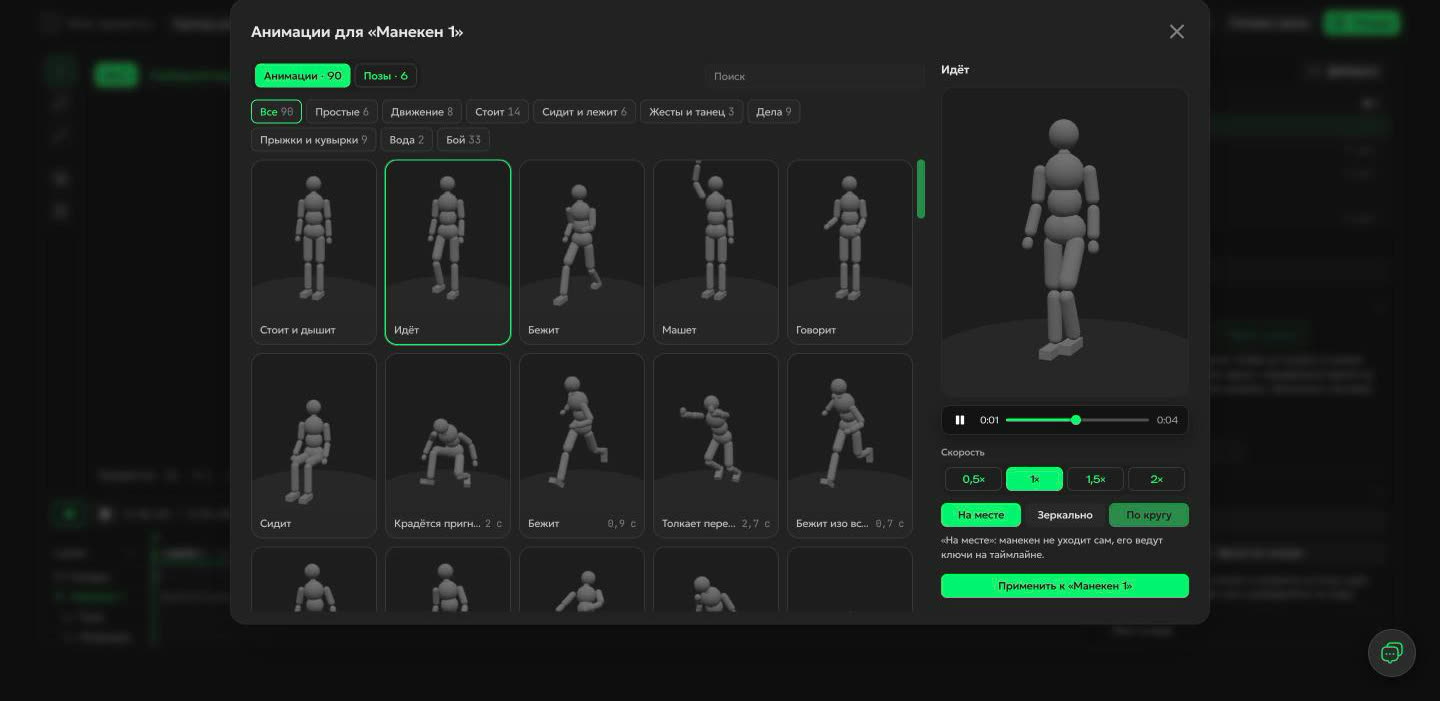
Motion is picked in the animation library with a live preview: 90 animations and 6 poses grouped into Simple, Moving, Standing, Sitting and lying, Gestures and dance, Tasks, Jumps and rolls, Water and Fighting. Each animation has a speed from 0.5× to 2× and the In place, Mirror and Loop switches.
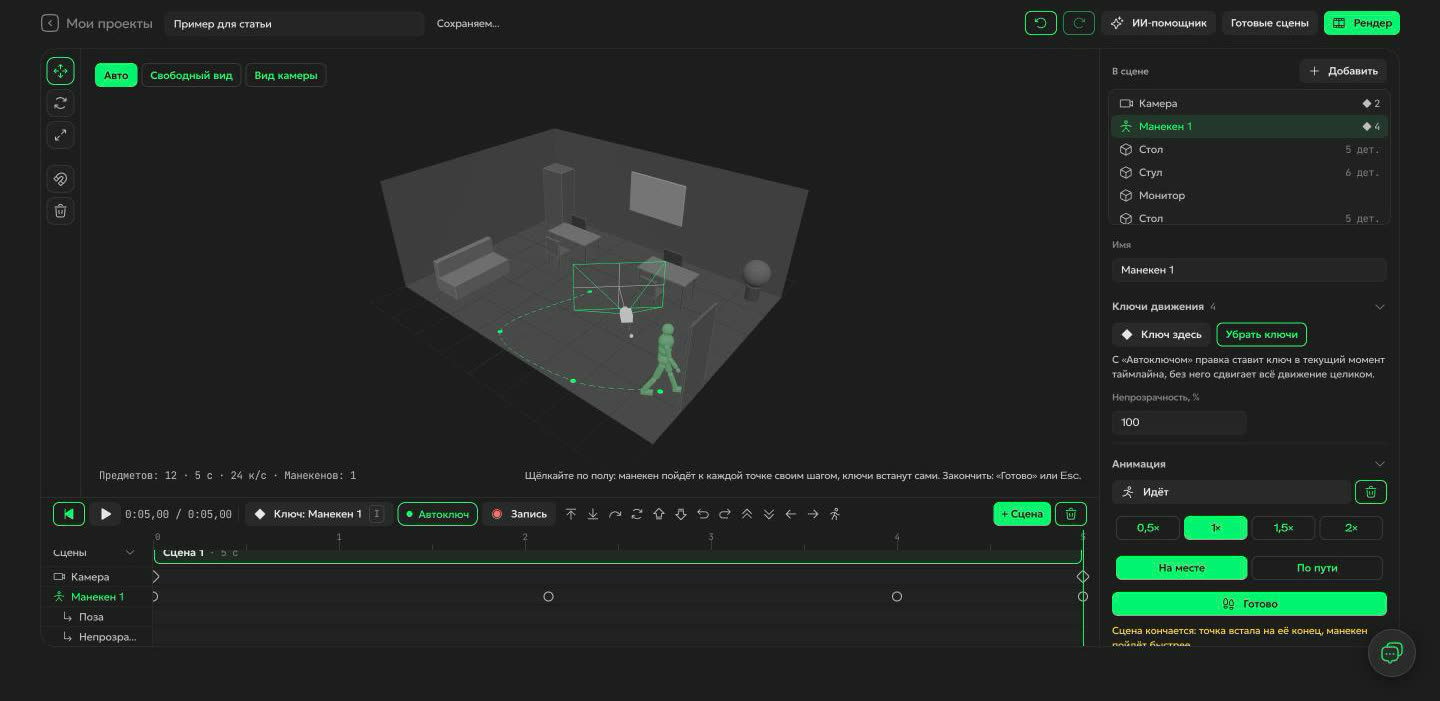
You lay out the path with the Walk to points button: click the floor, and the mannequin walks to each point at its own pace, turning as it goes. Keys appear on the timeline by themselves. In the screenshot below three clicks produced a dotted path and four keys for Mannequin 1.
Step 3. Camera movement: 13 ready moves
The camera in the scene is also an object with keys. The fastest way to set its movement is with the icons on the timeline. Each icon builds the move from where the camera stands at the start of the scene.
| Move | What the camera does |
|---|---|
| Push in, Pull out | moves towards the scene or away from it |
| Orbit 90°, Orbit 360° | circles the scene along an arc or a full circle |
| Crane up, Crane down | rises or lowers |
| Pan left, right | turns in place horizontally |
| Tilt up, down | turns in place vertically |
| Truck left, right | slides sideways without turning |
| Follow | travels after the selected object |
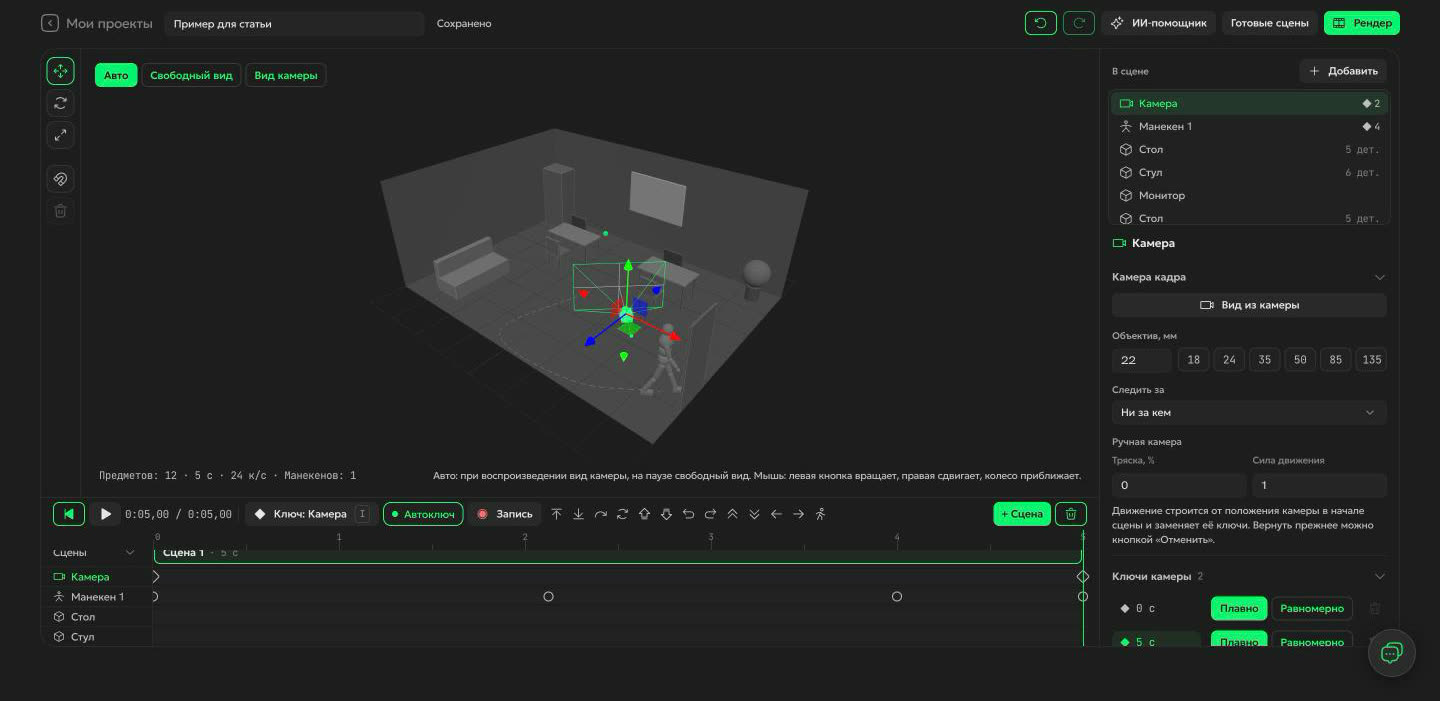
Next to them, in the Camera panel: the lens in millimetres with quick picks of 18, 24, 35, 50, 85 and 135 mm, Look at (the camera keeps the chosen mannequin or object in frame), Handheld with shake and Move strength. Between keys the camera moves in Smooth or Linear mode. You can also drive the camera with the mouse: the Record button writes keys while you move the view.
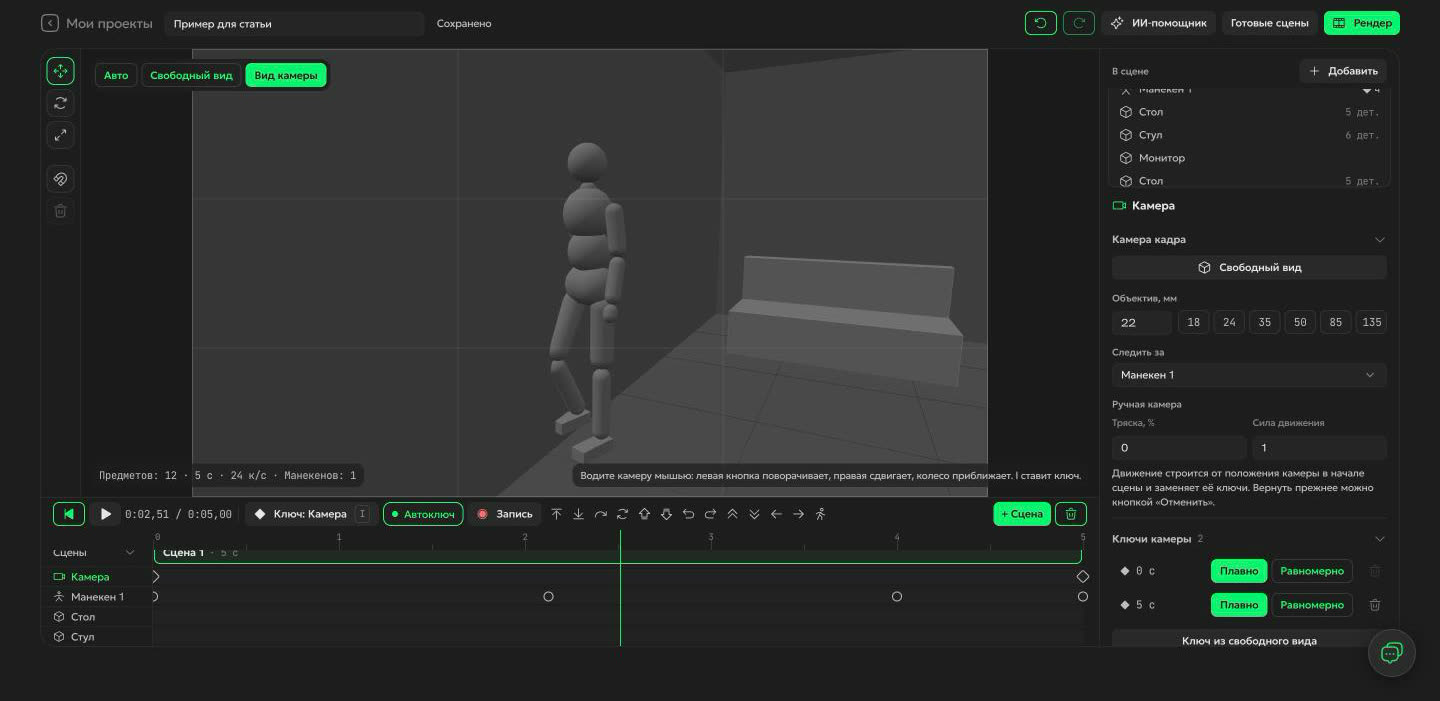
The Camera view tab shows the future shot with a format frame and a rule of thirds grid. There are no path lines or highlights there, and the mannequins are grey: this is exactly what ends up in the clip.
Step 4. Several scenes on one timeline
The + Scene button adds the next shot: a copy of the current scene, an empty room or a ready scene from the library. Scenes play one after another on a shared timeline, each with its own length from 1 to 30 seconds, up to 50 scenes per project. A copy is handy for a change of shot: mannequins and objects stay in place and you only change the camera.
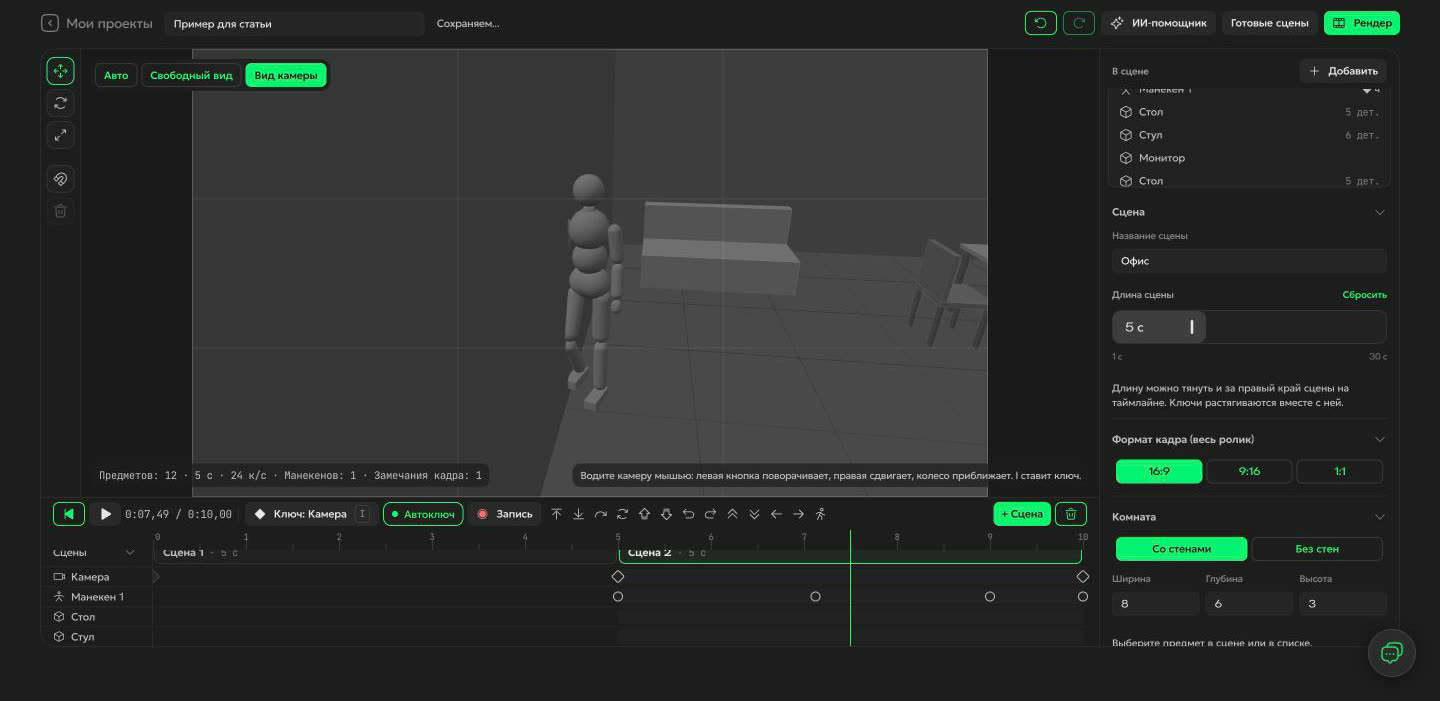
The result is a storyboard in motion: instead of a picture for each shot you get a short clip with the camera and the characters.
AI assistant: a scene from a description, a frame photo or a script
The AI assistant button above the editor opens the assistant, and the start window has its own field for it. It understands three kinds of requests:
- A scene description, for example "Put a desk by the window, a person named Anna by the far wall". The assistant places blockouts and mannequins, and one Undo removes all of its edits.
- A frame photo. The paperclip takes one photo (JPEG, PNG or WebP), and the assistant builds the scene from it.
- A script with several scenes. The assistant edits the current scene and adds up to eight new ones in one answer, each starting as a copy of the previous one.
You can paste the whole script, up to 2000 characters:
1. Office, morning. Anna sits at a desk by the window, wide shot from the door.
2. Medium shot: Anna stands up and walks to the door, the camera follows.
3. Close-up: Anna stops at the door and turns around, the camera slowly pushes in.
The assistant replies with a list of edits: you can remove any of them separately or undo them all at once.
Step 5. Rendering the previz to MP4
The Render button opens a window with a choice: one scene or all scenes together. Before starting, the window checks the shot and says "The frame is fine" or names the problem spot. The clip is assembled right in your browser, with no server and no tokens, at 24 frames per second.
| Frame format | Clip size |
|---|---|
| 16:9 | 1280 × 720 |
| 9:16 | 720 × 1280 |
| 1:1 | 1280 × 1280 |
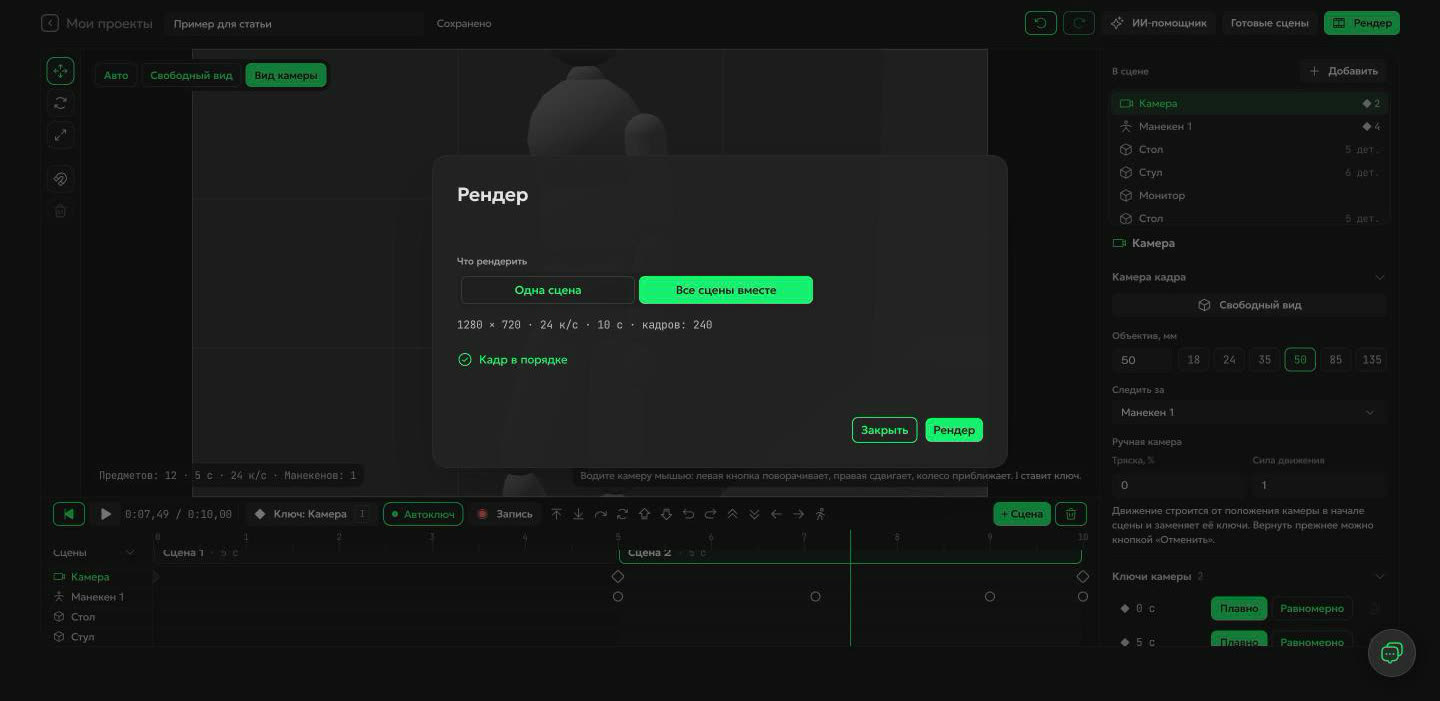
The frame format is one for the whole film and is set in the scene properties. For vertical Reels and Shorts pick 9:16 in advance: the frame in the Camera view tab shows right away what will be in the shot.
Step 6. Video from a reference in the studio
You download the finished MP4 with the Download MP4 button and generate the video in the studio the usual way. You need a model that takes video as input:
| Model | Video input |
|---|---|
| Seedance 2.5 Reference | up to 10 clips, each from 1.8 to 30.2 seconds |
| Wan 3.0 Reference | up to 5 clips with a total length of up to 15 seconds, at least 16 frames per second |
A previz from 2 to 15 seconds long suits both models: it runs at 24 frames per second.
From there it is the usual reference mode. Upload the previz and a photo of the character, and refer to them by number in the prompt. An example for the scene from this article:
@Video1 sets the camera, the angle and the path: repeat the camera move and the person's route exactly as in the clip.
Instead of the grey mannequin from @Video1, the shot shows the woman from @Image1.
Bright office, morning, sun through large windows, realistic footage, film grain.
Generation in Seedance 2.5 Reference costs from 64 tokens per clip. More on the modes: Seedance 2.5: three video modes and the Seedance page in the knowledge base.
FAQ: common questions about Director
Do I need to know 3D editors?
No. You build the scene from ready blockouts and mannequins, the camera moves with icons on the timeline, and you can describe the whole scene to the AI assistant in words.
Why are the mannequins grey and faceless?
The previz is responsible for geometry and motion. Looks, clothes and light come from the photo and the prompt, so a grey figure does not clash with your character.
Can I make a vertical video?
Yes. Pick the 9:16 format in the scene properties, and the render gives a 720 × 1280 clip.
How many scenes can one project hold?
Up to 50 scenes, each from 1 to 30 seconds long.
Where to start
Sign up and build your first scene in Director: building the scene, rendering and assistant answers cost no tokens. Generating video from the previz takes tokens, and the plans are on the pricing page.
Read next
Try Pixyn for free
Free start and a 3-day Premium trial, no card required.